Showing posts with label hack. Show all posts

Extract WhatsApp Chats and Messages From WhatsApp Backup File on iPhone or Android

WhatsApp is probably the most used messenger App to communicate across the mobile platforms including Windows Phone, Android, Blackberry and iOS (iPhone and iPad). Its also available globally so that you can send messeges across the globe for free. Its so popular that generally its the first app that is installed on a new mobile device. People even install WhatsApp on devices without SIM card.
If you are reading this, you probably already use WhatsApp. Do you know that all your WhatsApp chats are saved in an encrypted form on your device? So if you lost your WhatsApp data somehow, you can restore WhatsApp data from its backup file.
Even if your WhatsApp data is safe, you might still want to open the WhatsApp backup file to read all the messeges on a single page, instead of continuously pressing the ‘load older messages’ button. You can also search within your WhatsApp data after you decrypt it from its backup file.

How To Extract or Decrypt WhatsApp Backup File

1. First find the WhatsApp database backup file and copy it on your computer.
If you use WhatsApp on an Android device, the WhatsApp database backup file is,
/sdcard/WhatsApp/Databases/msgstore.db.crypt
If you have already rooted your Android device, you can also use the following files for WhatsApp backup,
/data/data/com.whatsapp/databases/msgstore.db
/data/data/com.whatsapp/databases/wa.db
If you extract the WhatsApp databse from msgstore.db or wa.db files, the name and phone number of a WhatsApp contact will also be displayed in the extracted file.
If you use WhatsApp on iPhone, the WhatsApp backup file is,
net.whatsapp.WhatsApp/Documents/ChatStorage.sqlite
If you don’t see this file, you can create it manually. To create a backup of your WhatsApp data on your iPhone, first connect it to your computer and start iTunes, and create a full unencrypted backup of your iPhone data.
Now download and install the iPhone Backup Extractor. Run the program and select the iPhone backup file your just created. Click on ‘Expert Mode’ in bottom right corner.
iphone-backup-extractor
Then click Application, find and select net.WhatsApp.WhatsApp and then click on Extract Selected.
backup-whatsapp-data-android
In the extracted data, the file ChatStorage.sqlite contains all your WhatsApp data backup. You can find it by clicking Extract selected option.
2. Now download WhatsApp Xtract package on your computer and extract it.
3. Now download and install Python programming language environment on your computer. Download the 32bit or 64bit version depending upon whether you are running the 32 bit or 64 bit version of Windows.
Update: Always download the 32 bit version of Python irrespective of the version of Windows you are running. Its reported that the 64 bit doesn’t work at all but the 32 bit version of Python works fine on 64 bit Windows.
Python is a programming language. But don’t worry, its not necessary to know how to program to follow this tutorial to extract the WhatsApp backup file. You just need to follow the steps and it will work just fine.
4. Now open the folder where you downloaded the WhatsApp Xtract archive. Find a file with name!install pyCrypto.bat, right click on it and click run as administrator. This bat file will execute the following Python command,
pypm install pycrypto
This comman automatically installs the pycrypto library on your computer, which will be used to decrypt the WhatsApp backup data.
5. Now in the same folder, run either whatsapp_xtract_iphone.bat, whatsapp_xtract_android_crypted.bat or whatsapp_xtract_android.bat depending upon the backup file you used. To run any of these files, simply right click on it and click run as administrator, just like above.
You can also run whatsapp_xtract_console.bat to specify the WhatsApp backup file manually,
/* For Android DB: */
python whatsapp_xtract.py -i msgstore.db -w wa.db

/* if wa.db is unavailable */
python whatsapp_xtract.py -i msgstore.db

/*for crypted db*/
python whatsapp_xtract.py -i msgstore.db.crypt

/*For iPhone DB*/
python whatsapp_xtract.py -i ChatStorage.sqlite
That’s it. As soon as the execution of the bat file or command is completed, all your WhatsApp backup data will be decrypted and will be displayed in the default browser on your computer.
whatsapp-backup-data-extracted-decrypted
You can now check all your WhatsApp chat messages! Enjoy the nostalgia.

Tutorial: A Guide to Link2SD for Android

Link2SD is an android application by Bulent Akpinar that lets you move apps and games to the 2nd partition of your SD card. Why do we have to use Link2SD when Froyo and Gingerbread’s Native Apps2sd moves the files to the SD card? Native apps2sd only moves the apk file of the application leaving other files in internal memory thus you still have to manage your on-board memory and limit your choice of apps because it will eat up your memory and later on you cannot install any files anymore. Additionally, widgets and some applications are not intended to be moved to the SD card. However, Link2SD is only for root users because it is required that your phone is rooted.
The idea behind the application is the same. But Link2SD has more relevant features which the Native Apps2sd lacked giving Android 1.5 and up users the chance to have a taste of what it’s like to have a big phone memory. Additional features were added by the developer to furher optimize the usage of android devices. By using Link2SD, you can move not only the application file, but also  the dalvic-cache and libray files of the application. This means that data will be the only one left to consume your internal memory thus installing applications and games would be easier because you can install anything you want without worrying about the famous low memory problem. Furthermore, Link2sd covers all files even moving widgets and the unmoveable applications to the 2nd partition of your SD card.
This is a step by step guide on how you can run Link2SD on your device. This tutorial will work for both stock and cutom ROMs. For ClockWorkMod Recovery users, you can check the other guide below. Follow all the instructions carefully to eliminate possible problems.
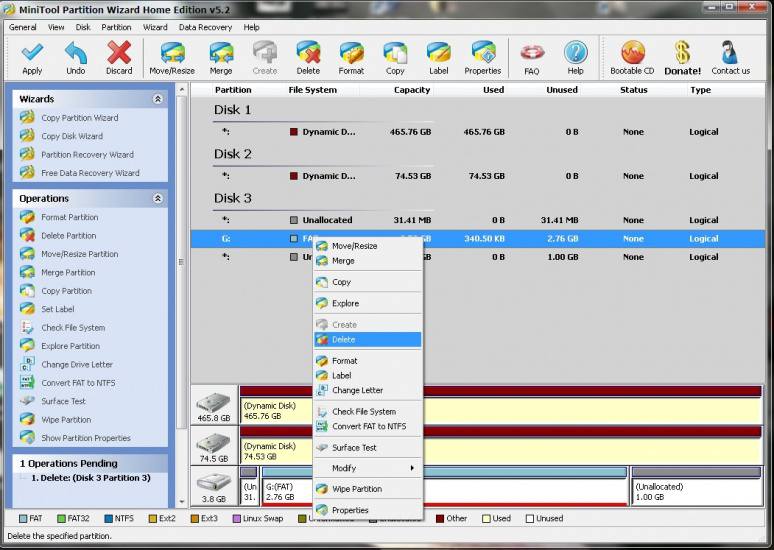
  1. First you have to download Mini Tool Partition Wizard Manager. You can download it HERE.
  2. Insert your SD card to a card reader and open it on your computer.
  3. Back up all your files to the computer because partitioning will wipe your data.
  4. Open Mini Tool in your computer. Locate your SD card (be careful in choosing and make sure not to choose the drive of your computer)
  5. Right click and choose Delete.link2sd 3
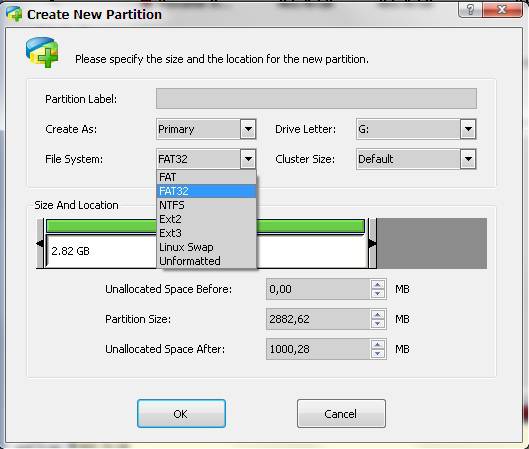
  6. Right click on it again and choose Create New. Create “FAT32″ partition (This is where all your media files will go. Be sure to make it bigger than the 2nd part)
  7. Select “Create as: PRIMARY” link2sd 4
  8. Next, create an ext2/ext3/ext4 partition (if you’re on stock ROM, choose ext2). This is where your apps will go. I suggest a value of 512Mb or 1Gb would be big enough but if you insist you can go as high as 2Gb.
  9. Select “Create As: PRIMARY” (make sure that it is both set to primary because it will not work if it is not set to primary) link2sd 5
  10. Click the “Apply” button on the top left corner and wait for it to finish the process. Done.
  11. Put back your SD card to your phone and switch it on.
  12. Download and install Link2sd from Google Play Store.
  13. Open Link2sd. You will be prompted to choose between ext2, ext3, ext4 and FAT32. Select ext2. link2sd 6
  14. It will say mount script created. Reboot your phone now.
  15. Open link2sd and if the message doesn’t show up, you succeded.
  16. Go to Link2sd>Settings>check the autolink (to automatically move apps upon installation)
  17. If you already have some apps, select “move to phone” then after moving select “Create Link” (be sure to check the three files: app, dalvic-cache and library files)
  18. link2sd 2link2sd
  19. To check your memory, select “Storage Info”. This will show you the current state of your internal memory, FAT32, and ext2 partition.                                                                                            link2sd 7
  20. Now you’re done and ready to install vast amount of applications as you wish!
FOR CLOCKWORKMOD RECOVERY USERS ONLY( ALTERNATIVE METHOD)
NOTE: You can also use the instructions above. This guide will work on both stock and custom ROMs.
  1. Back up all your files to your computer. Partitioning wipes the files of your SD card.
  2. Go into recovery mode
  3. Select “Advanced”
  4. Select “Partition SD card”
  5. Choose your SD-ext size (if you’re using a 2Gb SD card, choose 512Mb. If your SD card is 4Gb or greater, you can choose 1024Mb)
  6. Select 0 swap
  7. Wait for the process to finish. Reboot.
  8. Download and install Link2SD from Google Play Store.
  9. Open Link2SD you will be prompted to choose between ext2, ext3, ext4 or FAT32. Choose ext4.
  10. Follow instructions number 14-20. DONE!
Having troubles? Feel free to comment and post your questions below. Enjoy! :)

Access Zedge From India Now

“ZEDGE is currently blocked by certain Internet Service Providers and Mobile Operators in INDIA due to decree issued by the DOT and Indian High Court. This means that many users in India are unable to use this app and our websites.

But there is a small hack to get into zedge anyways.

Step 1 : Open Hidemyass 
Step 2 : Type zedge.net in the given textbox.
Step 3 : Click on Hidemyass Button.
Step 4:  Now you could access the zedge from india.

How to Photograph Light Trails

Photographing light trails is somewhat of a rite of passage for low light photographers – usually by setting up a nice landscape composition that includes a stretch of road and waiting for the right time when traffic is passing with their lights on. If you want to grab a similar shot know how to photograph light trails, then you’re in the right place!

Trailing off by CJ Isherwood, on Flickr
As you have probably figured out, light trails (aka “traffic trails” or “car light trails”) are basically made by combining a stationary camera, a long exposure and moving lights. With traffic, as the vehicles are moving through your frame, they are essentially invisible in the final shot leaving only the trail of their bright headlights or tail lights.
What Gear Will You Need for Photographing Light Trails?
One of the great things about shooting light trails is that it really doesn’t require a lot of gear. Basically, a camera and a stable place to put it are the essentials. In practice that means a camera, a tripod and a remote release.
What’s the Best Time to Shoot Light Trails?
Light trails can be shot in most low light conditions. Many of the most remarkable shots, however, are shot just after dusk in the blue hour. (Theoretically the hour before dawn works too, but it can be a lot harder to find a lot of cars or traffic on the roads at that hour). Many people also shoot remarkable light trails in fully dark conditions.
It’s also possible to shoot late in the Golden hour such as in the shot below.
Taking a Test Shot to Ensure Good Composition
Light trail shots are like any other. You need to compose them well. Ask yourself if the shot you are taking would look any good without the light trails. Try to experiment with traditional landscape compositions to get the one you most like. You might want to make reference to the Rule of Thirds, the Golden Section or other composition conventions (or throw out the lot), but make it deliberate. Just because you are shooting light trails doesn’t mean that the image will look great without other traditional elements that make a good photograph.
As you are shooting in low light and it can be difficult to see all of the elements, fire off a couple of test shots at a high ISO. This allows you to get the test shots done quickly and see them on your view finder. Don’t worry about noise etc – this is just to establish that you like the composition of the shot you are taking in the quickest way.
Now Start Considering Camera Settings
With your test shot out of the way, and your composition decided, you will then want to start considering camera settings. Obviously you are going to want a long shutter speed, while allowing as little noise into your final image as possible. That means you will want to flick the ISO down low – probably to 100.
If you want to keep as much of the frame in focus as possible (as you usually would) you will also want a narrow aperture. Somewhere between f16 and f22 will probably be about right. (Obviously this is for a wide depth of field. If you want a narrow depth of field (such as in the photograph of the Jim Beam bottle below) you will need to open up the lens with a lower Aperture setting). A narrow aperture will also give any stationary lights a “starburst” effect which is usually considered a good thing among many photographers.

beams by mugley, on Flickr
Finally you will need to set your shutter speed which will largely be determined by the first two settings. This will need to be long enough to get the trail effect of the lights moving through your frame. Make sure to use either your remote release or delayed timer on your camera so that you don’t move the camera while the shutter is open.
Note: A shortcut to figuring out the shutter speed is to shoot in Aperture Priority mode, but remember that this can sometimes fool the light measurements of your camera. If that happens, then you will want to shoot in manual mode to adjust for it. Shoot a couple of frames at different shutter speeds and be sure to check your histogram to make sure you aren’t losing any detail.
If you are confused about these settings, have a look at our explanatory article on the exposure triangle.

taixeta_6 by Aitor Escauriaza, on Flickr
Post Production for Light Trails
If you did everything right above, then you probably already have a very workable image. If you did it perfectly, you may not even need any post production. But sometimes these shots can use a little of the following helpers. Remember – go easy here – you might want to use one or all of these, but you shouldn’t need to move any of them more than a little.
Experiment with these Lightroom sliders (and check out this crash course):
  • Darken the Blacks
  • Tweak the Contrast
  • Tweak the Saturation and Vibrance
  • Tweak the Clarity
  • Tweak the Shadows and Highlights
Hopefully by this stage, you should be getting an image close to what you wanted to achieve. Shooting light trails can be a ton of fun and produce some great results. Share yours in the comments!

Subway Surfers Moscow Modded Unlimited Coins

Post Empty Status,Comment In Facebook


  • Login to your Facebook. 
  • Then type the following code in your status or Comment or Chat. 
  • Alt+0173
  • Press Enter

Decompile with Apk Tool With Easy Tool


Requirements:

ApkTool
Java JDK/JRE 32 bit 
Basic Cmd/terminal knowledge

Download ApkTool here

ApkTool.zip

first you need to extract that zip folder to anywhere you choose, preferably on root of c/drive ie: C:/android/apktool extracting the files to 'apktool' folder

Now place the STOCK framework-res.apk & whatever other apk's you would like to modify into the 'apktool' folder


Getting to CMD directory


Open up a Cmd Prompt (terminal) and get to the 'apktool' directory ie:


Your cmd will probly look like this..

C:\users\yourname>

so type in

cd.. (yes include the '..' and press enter after you type each command)

this will get you to back directory so now you will see

C:\users>

so type again

cd..

you should now see this:

C:\>

now type in:

cd 'apktoo'l/'directory'

for me it looks like:

cd android/apktool

now you should see:

C:/android/apktool>

and you are in the apktool directory 

Installing Framework

Now that you are in directory we need to install the device's framework to your system for it to compile correctly so type this:

apktool if framework-res.apk

this will install the devices framework to your system (need to do this)


Decompiling

now to decompile the apk you want to edit.. type this:

apktool d framework-res.apk framework1

or

apktool d music.apk music 

music.apk is the apk your decompiling
music is the folder you're creating for the decompiled apk

now make your edits DO NOT Change/Edit ANY PNG's


Recompiling/Finished Product

now to recompile your new apk type this:

apktool b music music-new.apk

or

apktool b framework1 framework-res-new.apk

framework1 is the folder with your edited files
framework-res-new.apk is your new apk file 

Now we are NOT done... we cannot use the new apk's... we have to take what we did and add it back to the original apk file to keep proper signature 

use something like 7zip, take the 'resources.arcs' file and any other xml files you edited out of the "-new" apk and copy them into Original apk 

now the apk is ready to flash with your new changes  

How to Download APK Files (Android Apps) from Google Play


Install an app from Google Play and, while the installer takes the form of an APK files, you’re never given the opportunity to download the file directly. Using the APK Downloader extension for Chrome, you can download any APK you need so you have it as a backup.

This does not mean that you can wade into the store and start downloading all of the premium apps and games you’ve always had your eye on. This is not a tool for piracy, but it will enable you to download the APK for any free apps.
Note: Using APK Downloader is against Google’s Terms of Service as it involves accessing Google Play using means ‘other than through the interface that is provided by Google’.
You can download a copy of the extension by paying a visit to Code Kiem. You will need to right click the link to the latest version of the extension and select Save Target As.

To install APK Downloader, click the menu button to the upper right of Chrome and select Settings, click Extensions and then drag the .crx file you have downloaded onto the extensions page – make sure you drag to the center of the page so the ‘Drop to install’ drop zone appears. Click Add and a new icon will appear to the far right of the address bar.


Click the Options link beneath the APK Downloader entry on the Extensions page and you will be asked to provide your email, password and device ID. Enter the email address and password associated with your Google Play account. The extension’s page provides details for why this information is needed.


When it comes to your Android Device ID, there are a couple of options available to you. If you’re using a phone, bring up your dialer and call *#*#8255#*#*. Scroll down through the data that is shown and beneath the JID entry which lists your email address, you’ll find your Device ID in hexadecimal format. We’re interested in the 16 characters that appear after ‘android-‘


If you have a tablet – although you can also do this with a phone – you should downloadDevice ID from Google Play. This provides you with the same information.


Enter all of these details into the Options page for APK Downloader and click Login.

Now you can head over to Google Play and start browsing through the available titles. When you find something you would like to download, open up its page and click the APK Downloader icon at the right hand side of the address bar and save the APK as you would any other download.


If you have trouble downloading APKs, go back and double check that your Device ID has been entered correctly – get it wrong and you’ll see nothing but download errors.

Macbuntu - Make your Ubuntu look like Mac OSX


If you love the Mac interface and you want to get this look onto your ubuntu operating system then here is a simple package that will install the Mac theme ,apps and resources onto your Ubuntu OS.And if you are a  Mac fan and you dont like to leave your linux OS at the same time,then you can get the look of a Mac OS X using a resource package called Macbuntu.Macbuntu is a awesome package to try out and check out the cool look of Mac OS Xin your ubuntu for free.
Macbuntu is not a simple theme that changes only icons and stuff,rather this installs all the app resources ,widgets and icons for the Mac interface completely onto your linux system without letting you paying like a Mac OS X and that too for free.So head over to sourceforge and download Macbuntu and enjoy the look and feel of a Mac OS X on your linux system.Macbuntu installs a number of applications from Mac OS that include Global Menu, Docky, Ubuntu-Tweak, Cheese, and even the Mac like Login screen.Follow these steps to install macbuntu in your ubuntu system.You can set a lot of options during the installation of the package like logo in the menu bar,window previewer and hot corner.

Download Macbuntu here. Type in the following  in the command prompt (Ubuntu 10.10) to install the Macbuntu package.
wget https://downloads.sourceforge.net/project/macbuntu/macbuntu-10.10/v2.3/Macbuntu-10.10.tar.gz -O /tmp/Macbuntu-10.10.tar.gz
 tar xzvf /tmp/Macbuntu-10.10.tar.gz -C /tmp  cd /tmp/Macbuntu-10.10/  ./install.sh 
To Download the package manually go to this link here..Download. To uninstall the package just type
./uninstall.sh
in the directory of tmp/macbuntu. You can even download the package using the link here..Download Macbuntu Let us know if you have any queries or if you like to share your experiences and suggestions about this topic let us know by your comment..Cheers..:)
Be Sociable, Share!

How to hack a pendrive and use it as RAM


Hi friends, Windows 7 and Windows vista comes with a ready boost option. Q-What is ready boost
Ans- "ReadyBoost is a disk cache component of Microsoft Windows, first introduced with Microsoft's Windows Vista in 2006 and bundled with Windows 7 in 2009. It works by using flash memory, a USB flash drive, SD card, CompactFlash, external hard drive or any kind of portable flash mass storage system as a cache. ReadyBoost is also used to facilitate SuperFetch, which allows it to perform analysis of boot-time disk usage patterns and creates a cache which is used in subsequent system boots." Source
If you are using a high configuration PC, It doesn't show any effect on speed because if you are a normal user I think only a few times you use your full ram memory but if you are using an old pc with low ram memory(Like 512 MB or IGB) and harddisk & using vista or 7. It speed up your PC and you will see the result, reduced application data loading time, reduced shutdown and restart time and many more you can't imagine without High ram memory. How to use this feature
Plug in your pendrive-> Format with NTFS or FAT32
Now go to properties->Select ReadyBoost
Check Use this device->Choose maximum space to reserve system speed
Click on Apply and OK. Your readyboost PenDrive is ready Now to Use.
Here is an personal suggestion HP and Sandisk is the Best for this work so what are you waiting for.